Are you searching for solutions to have form submission numbers tracked in Google Analytics 4 (GA4)? Google Tag Manager (GTM) offers a powerful solution for tracking website form submissions and pushing the data to GA4. However, for marketers who are not familiar with GA4 and GTM, the prospect of setting up Google Tag Manager to track form submissions might seem daunting due to the technical intricacies involved.
This article aims to demystify the setup of GTM for tracking various types of form submissions, from basic page view tracking and button clicks to more complex interactions like CSS selector and datalayer events. By the end of this guide, you’ll not only understand how to implement these tracking mechanisms but also how to interpret the data to make informed marketing decisions.
Understanding Form Submissions Tracking For GA4
While Google Analytics provides extensive insights into website traffic and user behaviour, it does not automatically track interactions as specific as form submissions. To capture this data, the information must be actively pushed from the website to Google Analytics. This can be achieved through server-side code adjustments or by using website plugins designed for form tracking. However, these methods can vary significantly depending on the website’s backend technology or require expertise with server side code.
A more universal and user-friendly approach involves using Google Tag Manager (GTM). GTM acts as a middleman between your website and data analysis tools like Google Analytics, simplifying the management of analytics scripts and other HTML/JavaScript snippets.
By using GTM, you can implement and update tag configurations without altering the code on your website, making it an ideal solution for tracking dynamic user interactions such as form submissions. This is particularly advantageous in environments like Google Analytics 4 (GA4), where the emphasis is on integrating event-based data to understand user behavior comprehensively.
GTM not only facilitates the seamless integration of these events into GA4 but also offers the flexibility to customise what data you collect and how it’s structured, enhancing your analytics capabilities without extensive technical intervention.
Types of Form Submission Tracking Methods
Tracking how users interact with forms on your website is key to optimising user experience and increasing conversion rates. Understanding the nuances of each interaction can help refine your approach, ensuring that you capture valuable leads effectively. Google Tag Manager (GTM) offers several methods to track these form submissions, each with its unique setup and benefits.
Below are four primary methods you can use with GTM to track form submissions, each suited for different scenarios and technical requirements:
- Page View Tracking: This method tracks when a user lands on a specific “Thank You” or confirmation page after submitting a form. It’s straightforward and effective for forms that redirect upon submission.
- Submit Button Click Tracking: Tracks every click on the submit button of a form, regardless of whether the form successfully submits. This method is useful for understanding submission attempts.
- CSS Selector For Success Message: Utilises CSS selectors to detect changes in form state or the appearance of success messages, indicating a successful submission.
- Custom DataLayer Event: Involves pushing a custom event to the DataLayer when a form is submitted successfully, which GTM then captures and sends to Google Analytics.
Tracking Form Submissions via Page View
When it comes to monitoring form submissions effectively, tracking via page view is a straightforward and reliable method. This approach is centered on identifying a specific “Thank You” or confirmation page that users are redirected to after they submit a form. By setting up a page view trigger in Google Tag Manager (GTM), you can capture these form submissions as conversions in Google Analytics 4 (GA4).
Step-by-Step Setup:
1. Identify the Confirmation Page:
Ensure that the form submission on your website redirects the user to a dedicated thank you or confirmation page. This page should have a unique URL that clearly indicates a successful submission (e.g., www.yoursite.com/thank-you).

2. Create a Page View Trigger in GTM:
In GTM, set up a new trigger that activates when the URL of the thank you page is loaded. Specify the URL of the confirmation page as a condition in the trigger settings.

3. Create a Tag in GTM and send the data to GA4.
Skip ahead to the tag creation steps portion of this article to learn how to set up the GTM tag. This step is applicable to all methods, as such, we have covered it below.
Pro Tip:
- Add a Referrer Condition: Enhance the accuracy of your tracking by including a referrer condition that checks if the user came from another page on your domain. This step helps mitigate bot spam, ensuring that only genuine user interactions are counted as conversions. The referrer condition works by confirming that the user landed on the thank you page after navigating from a different page on your site, which is typical of a legitimate form submission pathway.
Requirements for This Method:
- Form Redirection: The form must redirect the user to a specific thank you or confirmation page upon submission.
- Distinct URL: The confirmation page must have a distinct and identifiable URL.
- Same Domain: Ideally, the thank you page should be hosted on the same domain as the form. If it’s on a different domain, additional setup for cross-domain tracking is necessary.
Pros of This Approach:
- Ease of Setup: This method is simple to implement, requiring minimal technical adjustments.
- Versatility: It works across any CMS or website infrastructure that supports redirection to a thank you page.
Cons of This Approach:
- Dependency on Redirection: Any failure in the redirection process can result in conversions not being recorded.
- Complexity with Multiple Forms: If multiple forms need individual tracking, this method can become cumbersome as each form may require a unique thank you page.
- Potential for Missed Conversions: If the redirection or thank you page loading process is slow, users might close the webpage before the page loads completely, leading to missed conversion recordings.
Tracking Form Submissions via Submit Button Click
Tracking form submissions through the click of a submit button provides a direct method to measure user interactions with forms on your website. This method involves configuring Google Tag Manager (GTM) to recognise and record each click on the form’s submit button. Here’s how you can set this up effectively:
Step-by-Step Setup:
1. Enable Click Variables in GTM:
In GTM, go to Variables and enable all the relevant built-in click variables. These variables help capture details about each click event, such as Click ID, Click Classes, and Click Text.

2. Create an All Elements Click Trigger:
Set up a trigger that captures all click events on the website. This is initially used to gather data in GTM’s preview mode to analyse which variables can uniquely identify the form’s submit button.
Note: this step is optional but is encouraged for beginners who are not familiar with the various variable values of the button click. For advanced GTM users, you can skip steps 2 and 3, and proceed to directly create your All Elements Click trigger with the corresponding trigger conditions.
3. Enter Preview Mode and Test the Form:
Turn on GTM’s preview mode and perform a test submission on your form. This action allows you to observe how the click events are registered in real-time.
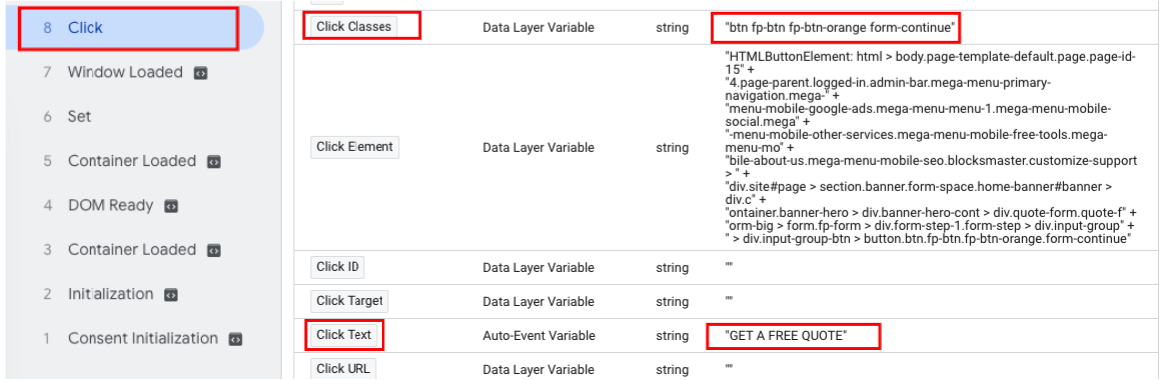
4. Analyse Variables in Preview Mode:
After submitting the form, check the events captured in the preview mode’s console tab. Specifically, look at the variables tab to identify unique identifiers such as Click Text or Click Classes that can distinguish the submit button click from other clicks.
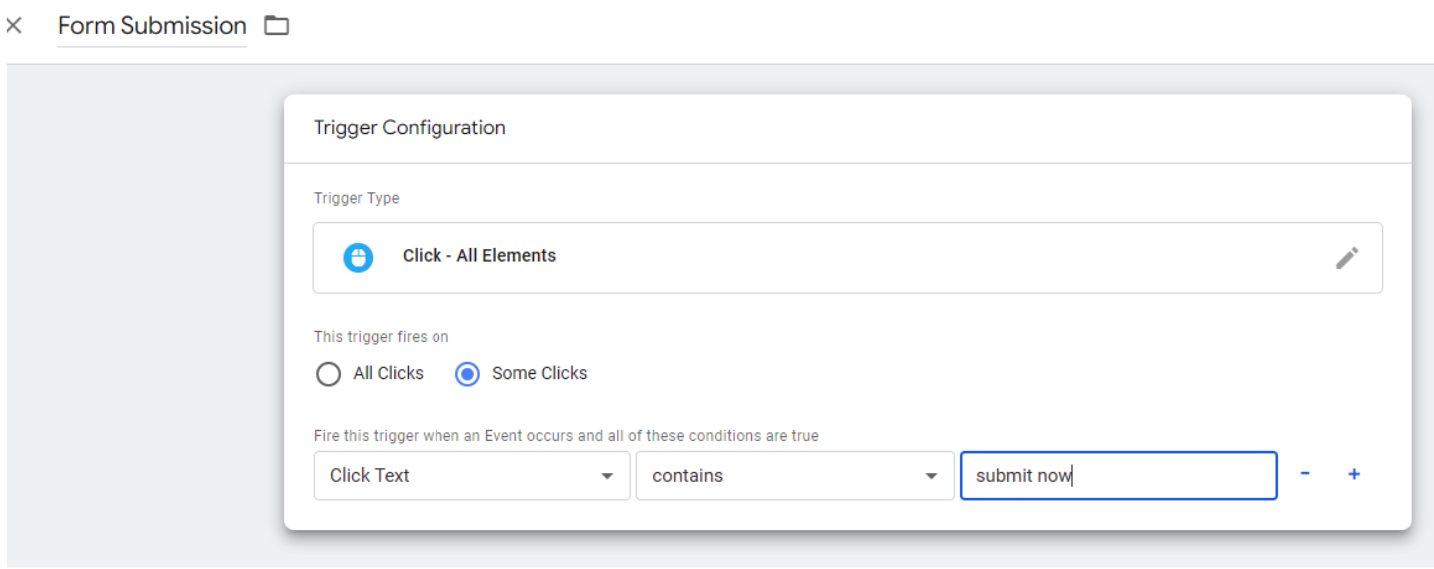
5. Refine Your Click Trigger:
Modify the all elements click trigger by adding conditions based on the identified unique variables. For example, if Click Text is “Submit”, use this as a condition to ensure the trigger only fires when the submit button is clicked.
6. Create a Tag in GTM and send the data to GA4.
Skip ahead to the tag creation steps portion of this article to learn how to set up the GTM tag. This step is applicable to all methods, as such, we have covered it below.
Pro Tips:
- Check for Similar Click Events: Ensure no other elements on the site can trigger the conditions set for the submit button. If necessary, use more specific identifiers or combinations of variables to isolate the button click.
- Handle Variations in Click Areas: Test clicking different parts of the button, as the variables like Click Text and Click Class might change. Consider using regular expressions (regex) to match variations or set up multiple triggers if needed.
- Limit Tag Fires: Configure the tag associated with the trigger to fire only once per page view. This prevents multiple counts of the same submission if a user clicks the submit button multiple times or if there are bot interactions.
Requirements for This Method:
- Trackable Clicks: Ensure that GTM can track clicks on the submit button. If the form is embedded via an iframe from another domain, GTM may not detect the clicks without additional configuration.
Pros:
- Versatility: This method is applicable across most content management systems and does not require advanced technical skills to implement.
- Direct Tracking: Directly tracks the interaction with the submit button, providing clear data on user intent to submit the form.
Cons:
- Potential for False Positives: Other elements on the website might fulfill the trigger conditions if not uniquely specified, leading to inflated conversion numbers.
- Possible Inaccuracies: Clicks on the submit button that do not result in successful form submissions (due to form errors) will still be counted, which could lead to misleading data.
Tracking Form Submissions via CSS Selector
One sophisticated method to track form submissions involves using a CSS selector to detect the appearance of a success message on the form page. A CSS selector is a pattern used to select elements on a web page based on their style properties, making it a precise tool for targeting specific elements like form submission success messages.
What is a CSS Selector and Its Use in Tracking Form Submissions?
CSS selectors pinpoint specific HTML elements based on their attributes, classes, IDs, or relationships with other elements. For tracking form submissions, CSS selectors can be employed to identify when a success message appears after a user submits a form. This method is particularly useful because it directly confirms a form’s successful completion through visible on-page feedback to the user.
Step-by-Step Setup:
1. Enable Browser Inspection Mode
Right-click on the web page and select “Inspect” or use the shortcut Ctrl+Shift+I (or Cmd+Option+I on Mac) to open the developer tools panel in your browser.
2. Perform a Test Form Submission
Submit the form to trigger the success message you intend to track. This step is crucial as it ensures the message you need to track is visible and can be inspected.
3. Inspect the Success Message
Right-click on the success message that appears after form submission and select “Inspect” to highlight its code in the developer tools. Here you can identify the unique CSS selector for the success message.

4. Create an Element Visibility Trigger in GTM
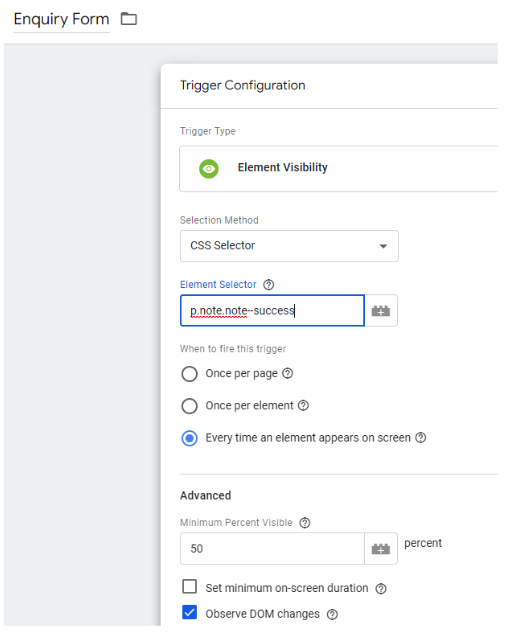
In GTM, create a new trigger and select the trigger type as “Element Visibility”. Set the selection method to “CSS Selector” and enter the identified CSS selector into the ID field.
Ensure to check the option “Observe DOM Changes” to monitor dynamic changes in the Document Object Model, which is essential if the success message is dynamically loaded.
5. Create a Tag in GTM and send the data to GA4
Skip ahead to the tag creation steps portion of this article to learn how to set up the GTM tag. This step is applicable to all methods, as such, we have covered it below.
Pro Tips:
- Adjust Visibility Percentage: If the success message does not fully appear within the viewport, adjust the ‘Minimum Percent Visible’ setting to a lower value, such as 1%. This increases the likelihood that the trigger will activate even if only a small part of the message is visible.
- Use a Chrome Extension: For those less familiar with using browser inspection tools to find CSS selectors, consider using a Chrome extension like “Copy CSS Selector” to simplify the process.
Requirements for This Method:
- Success Message Visibility: The form must not redirect upon submission and should display a success message within the current page’s viewport.
- No Page Redirection: This method relies on the form not redirecting to a different page, such as a thank you or confirmation page.
Pros:
- Accuracy: This method is highly accurate outside of the requirements mentioned, as it directly tracks the visibility of the success message, indicating a completed submission.
Cons:
- Technical Complexity: Setting up this method requires a good understanding of HTML and CSS, making it potentially overwhelming for beginners.
- Susceptible to Site Changes: Any design or functional changes to the form or its success message can affect the effectiveness of this tracking method. Continuous updates may necessitate frequent adjustments in GTM.
Tracking Form Submissions via Custom DataLayer Event
Understanding and utilising the DataLayer is a crucial component of sophisticated web analytics. In Google Tag Manager (GTM), the DataLayer functions as a data structure used to store and pass information about events that occur on a website to GTM, which can then be processed and sent to analytics platforms like Google Analytics 4 (GA4). By pushing custom events to the DataLayer upon actions such as form submissions, you can capture detailed, actionable data directly linked to user interactions.
What is the DataLayer?
The DataLayer is essentially a JavaScript object that acts as a repository for all kinds of information that you want to send from your website to Google Tag Manager. When an event occurs on your site—like a form submission—specific information about that event can be pushed to the DataLayer. GTM then uses this information to trigger tags and populate variables based on the data stored in the DataLayer.
Introduction to Custom DataLayer Events for Form Submissions
This tracking method involves pushing a custom event from your website or server to the DataLayer when a form is submitted. GTM can then use this event to track the submission accurately.
Step-by-Step Setup:
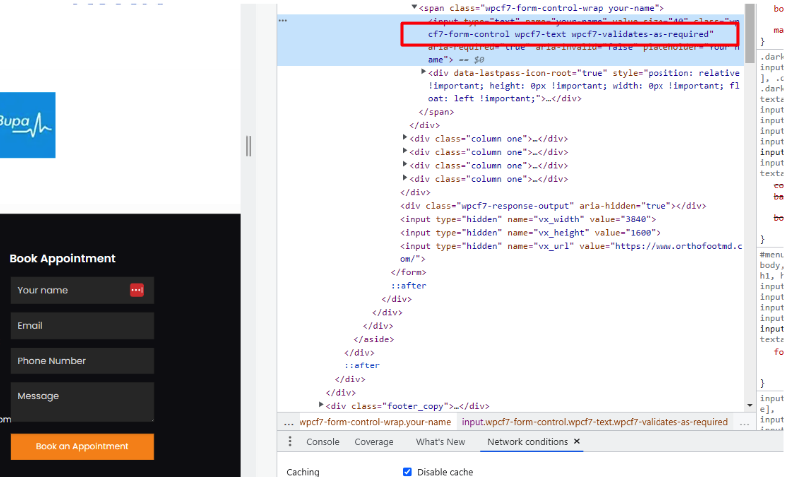
- Test for Existing DataLayer Events: Enable GTM’s preview mode and submit a form on your website to see if an event related to the form submission is already being pushed to the DataLayer. This step helps identify if the form interaction is being captured automatically.
- Create a Custom Event Trigger: If you find an existing event in the DataLayer, create a custom event trigger in GTM. This trigger should match the event name exactly as it appears in the DataLayer.
![]()
What Happens If Custom Events Do Not Exist?
- Research Form Type: If no relevant event is found in the DataLayer, use tools like the browser’s inspect tool or the Wappalyzer Chrome extension to identify the type of form used on the site. This will determine how you might set up a custom event.
- Documentation and Developer Integration: For common form plugins (like Contact Form 7, Gravity Forms, or HubSpot Forms), refer to documentation for instructions on how to push custom events to the DataLayer upon form submissions.
- For less popular or custom forms, coordinate with your website’s developer to implement a custom event that fires when the form is successfully submitted.
Pro Tips:
- Utilising Additional DataLayer Parameters: Pay attention to any additional data pushed to the DataLayer with the event. If valuable information (such as “price” nested within “ecommerce”) appears, set up corresponding DataLayer variables in GTM. For instance, to capture “price,” create a DataLayer variable with the path “ecommerce.price”. This allows you to tailor the data sent to GA4, enhancing your analytics with more detailed insights about each form submission.
Pros of Using Custom DataLayer Events:
- Accuracy: This method ensures that tracking is triggered only by actual form submissions, making it highly reliable.
- Flexibility: You can push a wide range of parameters to GA4, allowing for detailed analysis and segmentation.
- Scalability: Ideal for environments with multiple forms or complex tracking needs.
Cons of Using Custom DataLayer Events:
- Complexity: Requires a higher level of expertise in GTM and may be challenging for beginners.
- Setup Variability: Different forms may require unique setup processes, which can complicate implementation.
- Lack of Documentation: Custom or less common forms might not have readily available setup guides, necessitating custom development work.
Creating and Testing a Tag for the Form Submission Event
To effectively monitor and analyze form submission events through Google Analytics 4 (GA4), you need to create and configure a specific tag in Google Tag Manager (GTM). This tag will capture the data every time a user submits a form on your website. Here’s how to set up and test this tag:
1. Create a GA4 Event Tag in GTM
- Open Your GTM Workspace: Navigate to your Google Tag Manager dashboard and select the appropriate workspace for your website.
- Add a New Tag: Click on ‘Tags’ from the sidebar menu and then click ‘New’ to create a new tag.
- Configure the Tag: Choose ‘Tag Configuration’ and select ‘Google Analytics: GA4 Event’.
- Connect the tag to your GA4 configuration by selecting or entering your GA4 Measurement ID. This ID links the tag directly to your Google Analytics 4 data stream.
- Set Up the Event Parameters: Define the event name that corresponds to form submissions, such as ‘form_submit’. Optionally, add event parameters to capture more detailed information about the form submissions, such as form name, form ID, or user inputs, provided they comply with privacy regulations.
- Link the Tag to Your Trigger: Under ‘Triggering’, select the trigger you’ve created for form submissions. This could be a trigger based on form page views, button clicks, CSS selectors, or DataLayer events, depending on your earlier setup.
- Save and Name Your Tag: Give your tag a descriptive name, like ‘GA4 Form Submission Event’, and save it.
2. Test Your Tag Setup in GTM Preview and GA4 Debug Mode
- Activate GTM Preview Mode: Go to the ‘Workspace’ where your tag is located and click ‘Preview’. Enter your website’s URL to start the preview session. This mode allows you to see in real time how the tags fire when you interact with your website.
- Enter GA4 Debug Mode: Navigate to your GA4 property and go to the ‘DebugView’ under the ‘Configure’ section. Open your website in a new tab. If you have the Google Analytics Debugger extension installed and enabled, it will automatically start sending debug data to GA4.
- Perform Form Submissions: Submit the form on your website while both the GTM preview and GA4 debug modes are active. Observe how the tag you created reacts. Check that the ‘form_submit’ event (or your custom event name) appears in the GTM preview mode and is captured in the GA4 ‘DebugView’.
- Verify Event Parameters: Ensure that all event parameters you set up are being captured correctly and displayed in GA4. This confirms that the data is being sent and recorded as intended.
- Adjustments if Needed: If the tag does not fire as expected, revisit your tag and trigger configurations to make necessary adjustments. This might involve tweaking event parameters, modifying the trigger conditions, or correcting any setup errors.
Identifying the Type of Form on Your Website
To effectively set up form submission tracking, it’s crucial to first identify the type of form your website uses. This knowledge will guide your configuration in Google Tag Manager and ensure that your tracking setup is accurate. You can identify form types either by manually inspecting the code or by using tools like the Wappalyzer Chrome extension. Here’s how to do both:
Manual Inspection of Form Code
- Open the Website: Navigate to the page on your website where the form is located.
- Access Developer Tools: Right-click on the form and select “Inspect” or use keyboard shortcuts (Ctrl+Shift+I on Windows or Cmd+Option+I on Mac) to open the developer tools in your web browser.
- Examine the Form Elements: In the Elements panel of the developer tools, look at the form’s HTML structure. Pay attention to the <form> tag and note any unique identifiers like id, class, or name attributes. These can give clues about the form type.
- Look for hidden input fields or specific form-related data attributes that might indicate the form technology or plugin used (e.g., data-form-type=”contactForm7″).
- Check for Script References: Scroll through the HTML and look for any linked JavaScript files or inline scripts within or near the form code. The names of these files can sometimes indicate the form plugin or framework used (e.g., scripts with references to “GravityForms” or “NinjaForms”).
Using Wappalyzer to Detect Form Technologies
- Install Wappalyzer: Go to the Chrome Web Store and search for the Wappalyzer extension. Install it by clicking “Add to Chrome.”
- Visit Your Website: With Wappalyzer installed, navigate to the page on your site that contains the form.
- Analyze the Page with Wappalyzer: Click on the Wappalyzer icon in your browser’s toolbar. A dropdown will appear listing all the technologies detected on the page.
- Look under categories such as “Web Frameworks” or “JavaScript Libraries” for entries that relate to form technologies (e.g., Wix Forms, HubSpot Forms).

Pro Tips:
- Cross-Reference Findings: If you are unsure about the form type after using one method, use the other to confirm or clarify your findings. For example, if Wappalyzer detects “HubSpot Forms,” confirm this by manually inspecting the form’s HTML structure for any HubSpot-specific identifiers.
- Regular Updates: Keep your Wappalyzer extension updated, as new technologies and updates to existing ones can change how elements are detected.
- Check for iFrames: If no form type is detected through initial methods, consider the possibility that the form might be embedded using an iframe. This can complicate detection because the form technically resides on a different webpage embedded within your site. Perform a manual inspection by looking for <iframe> tags around the form area, or use a Chrome extension like “iFrame detector” to identify iFrames more easily. If an iframe is used, you might need additional settings to manage cross-domain tracking.
Overview Of Specific Forms
Tracking form submissions accurately is crucial for analysing user behaviour and optimising conversion rates on your website. For those using popular form builders, setting up tracking, especially using the DataLayer method with Google Tag Manager, can be streamlined by following specific documentation provided by each form builder. First Page Digital is in the process of creating detailed guides for each major form type, which will be linked here once published. These guides will provide step-by-step instructions tailored to each form type, ensuring you can set up tracking efficiently and effectively.
Popular WordPress Forms
WordPress users benefit from a variety of robust form plugins, each with unique features. The following are some of the most widely used WordPress form plugins, and specific guides for setting up submission tracking on these forms will be available shortly:
- Contact Form 7: One of the oldest and most downloaded contact form plugins for WordPress, known for its simplicity and extensibility.
- Ninja Forms: A user-friendly form builder with a drag-and-drop interface, suitable for beginners and advanced users alike.
- Gravity Forms: Known for its advanced functionality and integrations, ideal for complex form creation.
- WPForms: Focuses on user experience with a strong emphasis on making form building accessible to everyone.
- Elementor Form: Integrated within the Elementor page builder, this form tool allows seamless integration with your page designs.
- Fluent Forms: A fast and lightweight form plugin, designed for performance and flexibility.
- Divi Form: Embedded within the Divi theme framework, these forms maintain the styling and responsiveness of the Divi ecosystem.
- Forminator Form: A versatile plugin that supports quizzes, polls, and forms, offering a range of customisation options.
Popular Non-WordPress Forms
For those not using WordPress, many other platforms offer robust form solutions that can be integrated with Google Tag Manager for effective tracking:
- Squarespace Forms: Integrated directly within the Squarespace website builder, offering seamless design and functionality.
- Wix Forms: Built into the Wix platform, these forms are designed to work effortlessly with the wide range of features offered by Wix.
- HubSpot Forms: Part of the HubSpot inbound marketing and sales platform, these forms are crucial for lead generation strategies.
- Podia Forms: Ideal for online stores and digital product sellers using the Podia platform.
- Pardot Forms: Aimed at B2B marketing, these forms are part of the Salesforce ecosystem and are designed for higher-level marketing automation.
Upcoming Guides and Documentation
The individual guides for each form type will cover everything from the basic setup of tracking in Google Tag Manager using the DataLayer method to more advanced configurations and troubleshooting. These guides will be essential for anyone looking to implement sophisticated tracking mechanisms on their websites without extensive technical expertise. Links to these guides will be provided here as they are published.
Stay tuned for these comprehensive resources, which will ensure that you have all the information needed to successfully track form submissions and analyse user interactions on your website effectively.
Conclusion
Effectively tracking form submissions is an essential component of a robust digital marketing strategy, providing critical insights into user behaviour and campaign effectiveness. At First Page Digital, we understand the importance of accurate and comprehensive data analytics. As a leading digital marketing agency, we specialise in integrating advanced tracking solutions like Google Tag Manager with Google Analytics 4 to help businesses optimise their online presence and conversion rates.
We invite you to consult with us at First Page Digital for all your marketing data needs. Let us help you harness the power of detailed analytics to refine your marketing strategies, improve user engagement, and ultimately boost your conversions. All our SEO services and PPC campaigns include complimentary form submission tracking. Reach out today to learn more about how we can tailor our services to meet your specific requirements and help you achieve your digital marketing goals.
Glossary Of Terms
- DataLayer: A JavaScript object used in webpages to store and pass information about events that occur on the website to Google Tag Manager. The DataLayer captures and holds all the user interactions data that you want to track, which can then be passed on to analytics tools.
- Custom DataLayer Event: An event that is manually pushed to the DataLayer when specific actions are taken on the website, such as form submissions. This method allows for more accurate and customised tracking setups.
- CSS Selector: A pattern used to select the elements you want to style in HTML. In the context of GTM, CSS selectors can be used to detect changes in form states or the appearance of specific elements like success messages on a webpage.
- Element Visibility Trigger: A type of trigger in GTM that fires tags based on the visibility of a specified element on the screen. This is useful for tracking elements that may not be initially visible when the page loads, such as modal windows or form success messages that appear only after certain conditions are met.
- Referrer Condition: A condition in GTM that checks the referrer of a page view to ensure that it originates from a specified domain. This is used to filter out unwanted hits from bots or external sources.