Tracking ecommerce events is essential for understanding how users interact with your online store and measuring the effectiveness of your marketing efforts. Google Tag Manager (GTM) offers a powerful and flexible way to manage these tracking setups without needing to constantly update your website code. In this guide, we’ll walk you through how to track key ecommerce actions, from product views to purchases using GTM, so you can gain valuable insights and optimize your store’s performance with accurate data.
Recently, I did a training with marketers on using GTM to track ecommerce events. In this session, I covered ecommerce tracking for general setups and individual CMS, going from beginner to intermediate processes.
![]()
Requirements for GA4 Standard Ecommerce Events
To effectively track ecommerce interactions using Google Analytics 4 (GA4), it’s important to understand the specific event structure and parameters that GA4 expects. GA4 defines a set of standard ecommerce events designed to capture key user actions across the shopping journey, from product impressions to purchases.
Why Following GA4’s Event Requirements Matters
Adhering to these event names and parameters ensures that your ecommerce data is:
- Consistent — Enabling accurate reporting and comparison across platforms.
- Comprehensive — Capturing the full customer journey through the funnel.
- Optimized for Analysis — Allowing GA4’s machine learning features to provide better insights and predictive metrics.
- You can find the full official reference of GA4 ecommerce events and their parameters on Google’s developer site: https://developers.google.com/analytics/devguides/collection/ga4/reference/events
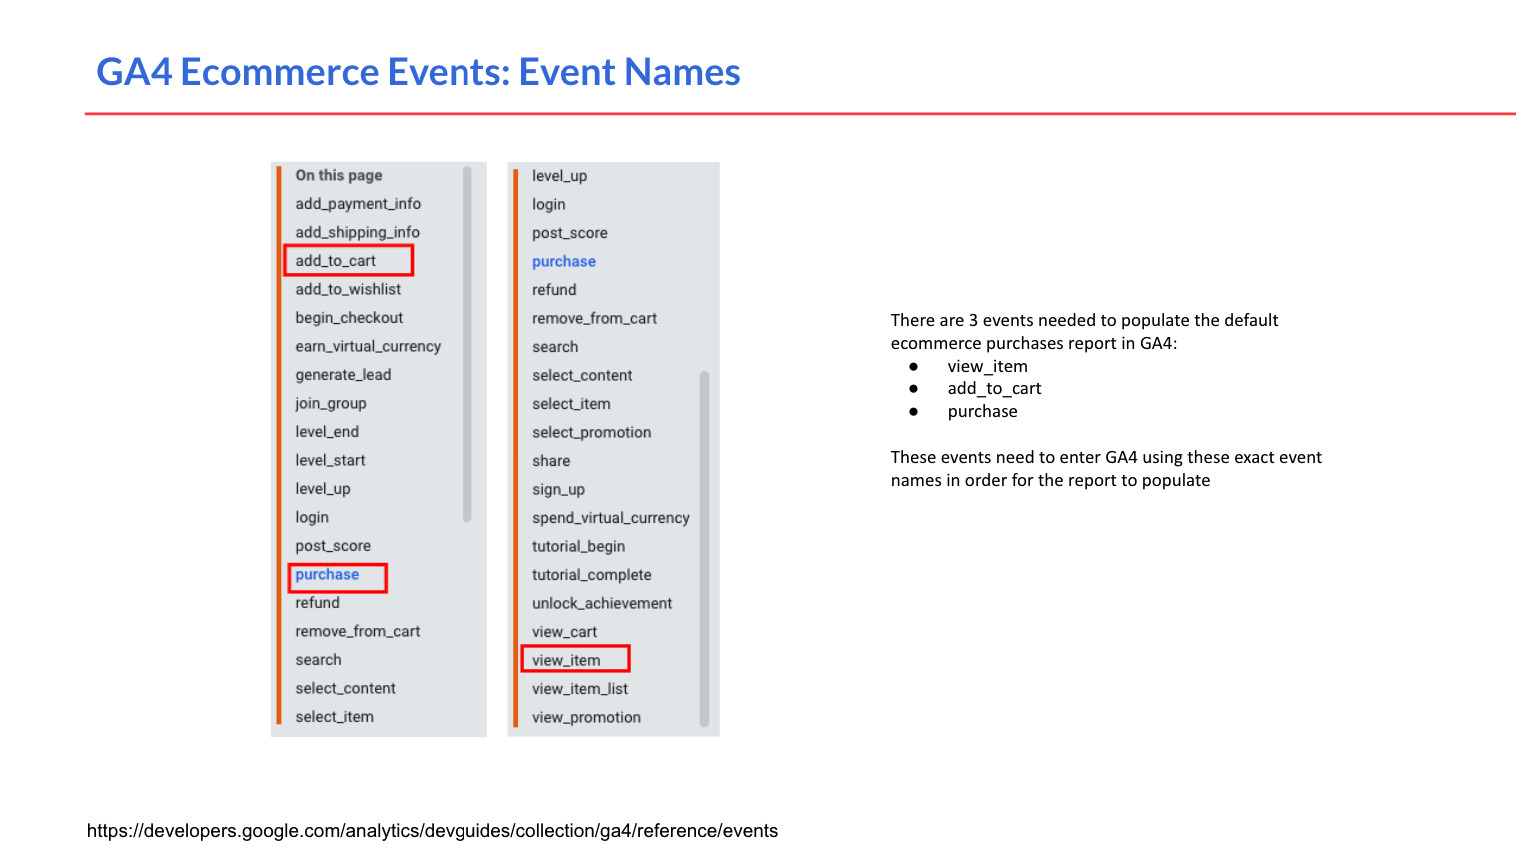
Key Events
Each ecommerce event in GA4 follows a defined event name and requires certain parameters to ensure the data is captured correctly and can be used for reporting and analysis. These events include:
- view_item — Triggered when a user views a product detail page.
- add_to_cart — When a product is added to the shopping cart.
- remove_from_cart — When a product is removed from the cart.
- begin_checkout — When the user starts the checkout process.
- purchase — Completed purchase event.
- view_cart — When the user views their shopping cart.
- view_item_list — When a list of products is displayed.
Key Parameters to Include
For each event, GA4 requires the inclusion of ecommerce-related parameters to describe the product(s) involved and the context of the action. The most important parameters include:
- items — An array of product objects containing details like:
- item_id or item_name (unique product identifier or name)
- item_brand
- item_category
- item_variant
- price
- quantity
- value — The total monetary value associated with the event (e.g., cart total, purchase amount).
- currency — The currency code, such as USD or SGD.
Tracking the view_item event
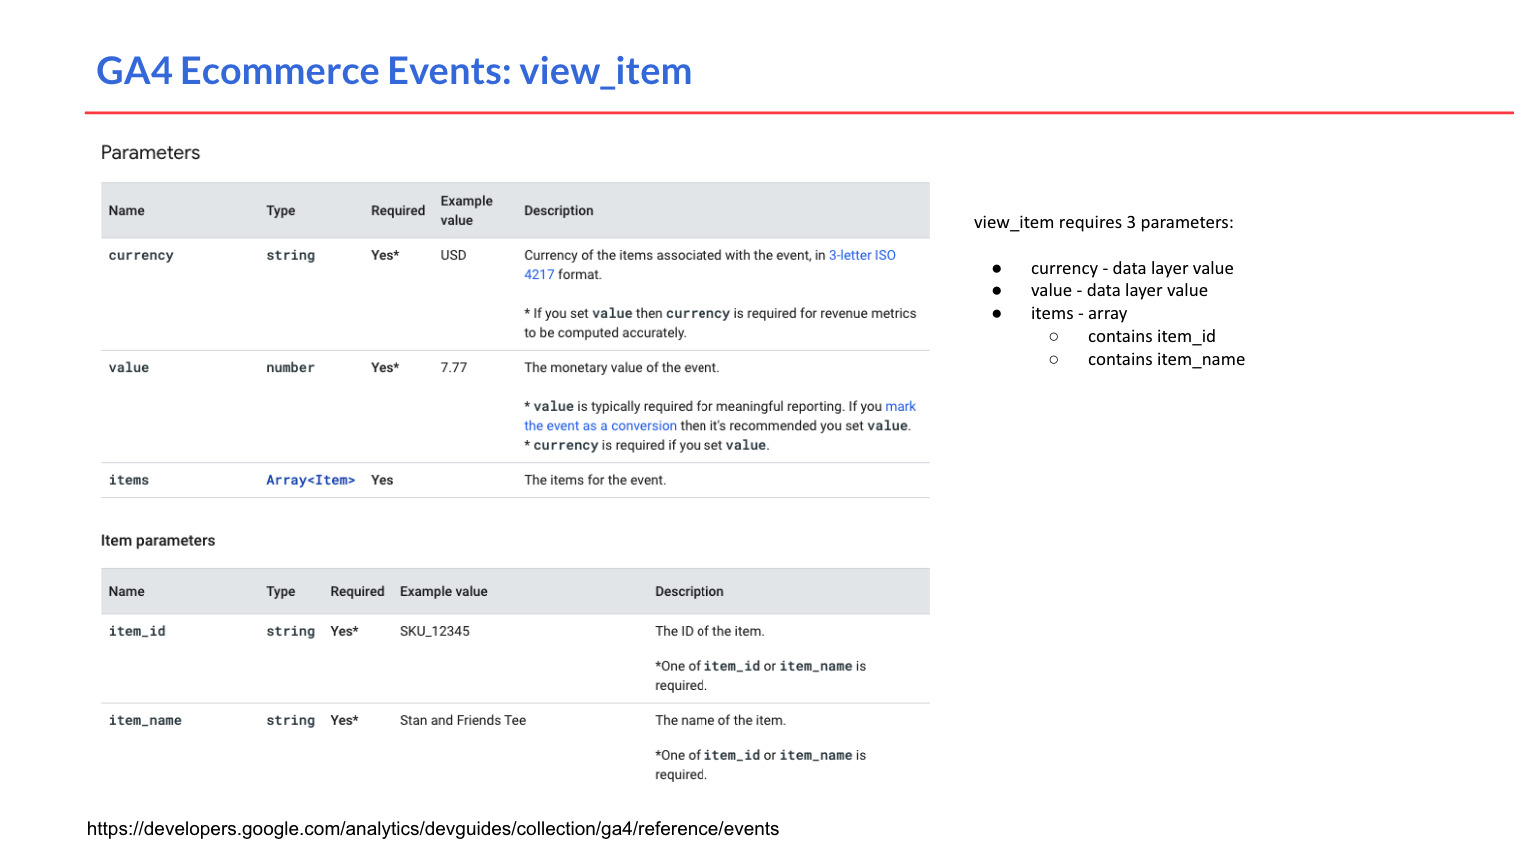
The view_item event is crucial for capturing when a user views a specific product detail page. To send this event correctly in GA4 via Google Tag Manager, there are three mandatory parameters you need to include:
- currency — A string that contains the currency code for the product price (e.g., SGD, USD). This should be pulled from your data layer or site.
- value — A value that contains the total monetary value of the viewed product, usually its price. This value also comes from your data layer.
- items — An array containing the product details. This array must include at least:
- item_id — The unique identifier for the product (e.g., SKU or product code).
- item_name — The name or title of the product.
It’s important to note that items must be structured as an array of objects (even if there is only one product), whereas parameters like currency and value are single values such as strings or numbers. This distinction affects how you extract and push the data into your data layer and configure your tags in GTM.
Other item parameters like item_brand, item_category, item_variant, and price are optional but recommended to provide richer product context and enhance reporting.
Ensuring these required parameters are correctly populated and passed with the view_item event helps GA4 accurately capture product views and attribute them to the correct products in your analytics reports.
Tracking the add_to_cart event
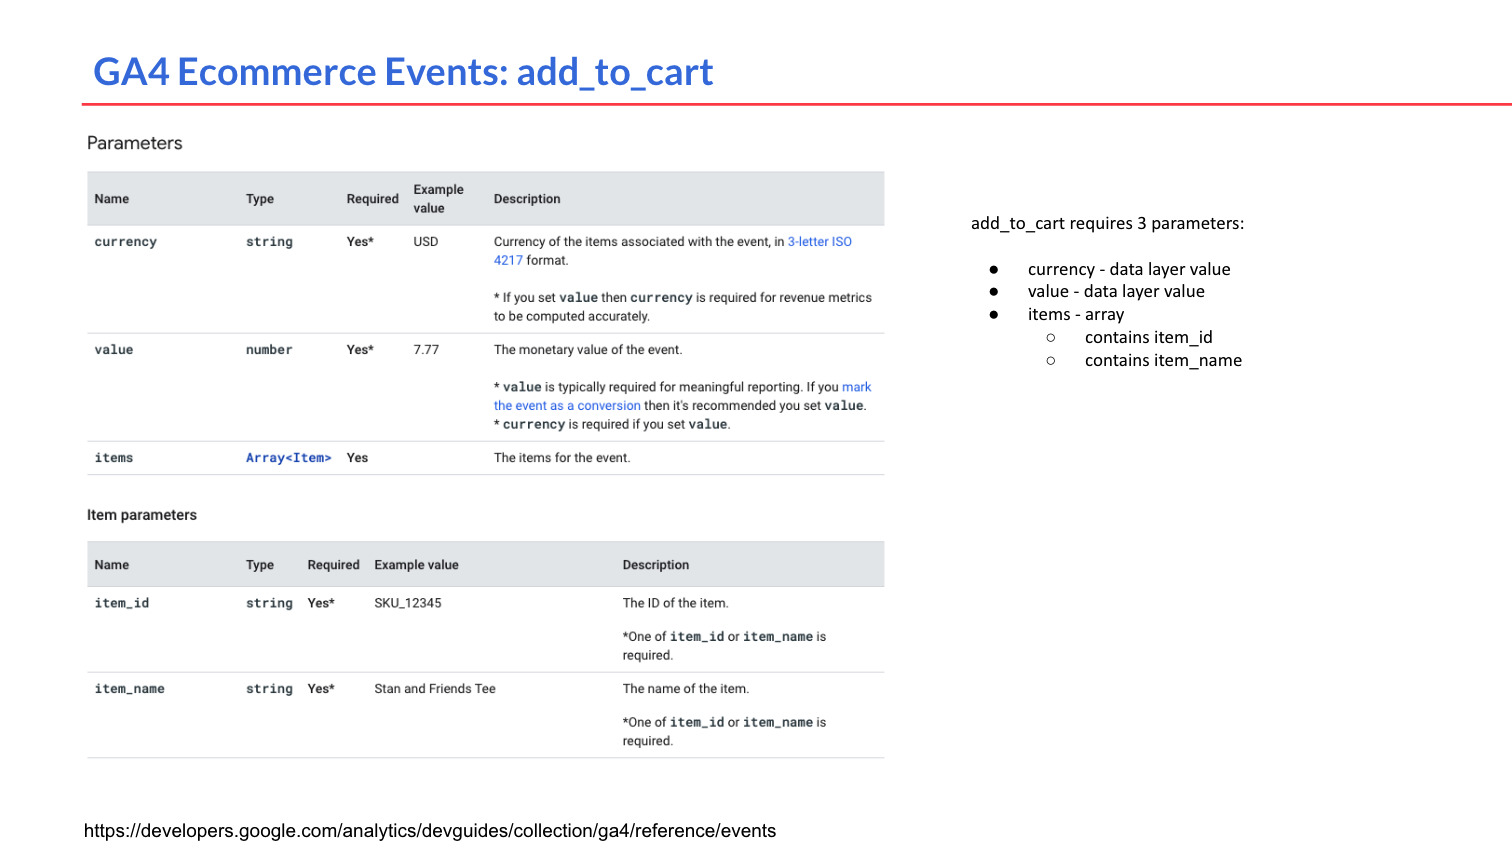
The add_to_cart event tracks when a user adds a product to their shopping cart — a critical moment in the ecommerce funnel. To implement this event correctly in GA4 using Google Tag Manager, you must include three required parameters:
- currency — The currency code for the product price (e.g., SGD, USD), sourced from your data layer.
- value — The total value of the product(s) added to the cart. This usually corresponds to the product price multiplied by the quantity.
- items — An array of product objects representing the items added. Each object in this array must include at least:
- item_id — The unique product identifier (SKU, product code, etc.).
- item_name — The product name or title.
Similar to the view_item event, the items parameter must be structured as an array of objects, even if only one product is involved. In contrast, parameters like currency and value are single values (strings or numbers). Understanding this difference is important when extracting data from your data layer and configuring your GTM tags.
Optional item parameters such as item_brand, item_category, item_variant, and price can be included to provide more detailed insights and improve ecommerce reporting.
Making sure these mandatory parameters are properly passed with the add_to_cart event will help GA4 accurately reflect user engagement with your products and support data-driven marketing decisions.
Tracking Purchase Event

The purchase event marks the completion of a transaction and is one of the most critical ecommerce events for GA4 tracking. To properly track purchases via Google Tag Manager, you need to include four mandatory parameters:
- currency — The currency code for the transaction (e.g., SGD, USD), typically retrieved from your ecommerce platform or data layer.
- value — The total revenue amount for the purchase, including taxes and shipping if applicable.
- transaction_id — A unique identifier for the transaction or order, which helps prevent duplicate purchase tracking.
- items — An array of product objects representing the purchased products. Each object in this array must contain at least:
- item_id — The unique product identifier (SKU, product code, etc.)
- item_name — The name or title of the product
As with other ecommerce events, the items parameter must be structured as an array of objects, even if the purchase contains only one item, while parameters like currency, value, and transaction_id are single values (strings or numbers). Understanding this difference is important for correctly setting up your data layer and GTM tags.
Optional parameters such as tax, shipping, item_brand, item_category, price, and quantity can also be included to provide richer ecommerce data for analysis.
Including these required parameters accurately with the purchase event ensures GA4 can track transactions reliably and provide valuable insights into your store’s revenue and customer behaviour.
Setting Up GTM For Ecommerce Events

To set up GTM tracking for ecommerce effectively, the first step is to use Google Tag Manager’s Preview & Debug mode to identify whether ecommerce events are present at each key user interaction. From there, you can verify if the required data parameters exist in the data layer and ensure they are accurate before proceeding with tag configurations.

Here’s a step-by-step approach to effectively use preview mode for testing your ecommerce tracking:
1. Verify Ecommerce Events Appear at Each Step
As you navigate through your online store in preview mode, confirm that the expected ecommerce events show up in the data layer at each critical interaction:
- view_item when a product detail page is loaded
- add_to_cart when a product is added to the shopping cart
- purchase when a transaction is completed
Tracking these events correctly is fundamental to capturing the user’s journey through your store.
2. Check That Corresponding Tags Fire for Each Event
Once an ecommerce event appears in the preview console, ensure that the associated GTM tags configured to send these events to GA4 are actually firing. This confirms that your triggers and tag configurations are working properly.
3. Investigate Data Layer Contents if Tags Do Not Fire
If you observe ecommerce events appearing but no tags firing, the next step is to inspect the data layer for that event. Look closely at the event payload to understand what data is available. This helps identify whether the problem lies in your tag trigger conditions or data layer implementation.
4. Confirm Required Parameters Are Present in the Data Layer
For each ecommerce event, check if the required parameters are included in the data layer payload. These parameters typically include:
- currency
- value
- transaction_id (for purchase event)
- items array with at least item_id and item_name
Note that the exact parameter names in your data layer don’t have to match GA4’s documentation verbatim at this stage. What matters most is that the correct values are present and can be accurately mapped to GA4 parameters in your tag configuration.
Creating DataLayer Events
To track ecommerce events accurately in GA4 via GTM, you need to ensure the relevant ecommerce data is pushed into the data layer with clearly defined keys for parameters like currency, value, transaction_id, and items. These values are then extracted inside GTM using Data Layer Variables.
Let’s look at an example data layer snippet from an actual purchase event:
Extracting the value Parameter
In this example, the total purchase value is represented by the revenue field inside ecommerce.purchase.actionField. To use this value in GTM for your GA4 purchase event tag, you would:
Create a Data Layer Variable in GTM.
Set the variable name to:
ecommrece.purchase.actionField.revenue
This variable will now retrieve the value needed for the purchase event.
Similarly, for other parameters like currency, you can create a Data Layer Variable with the path:
ecommerce.currencyCode
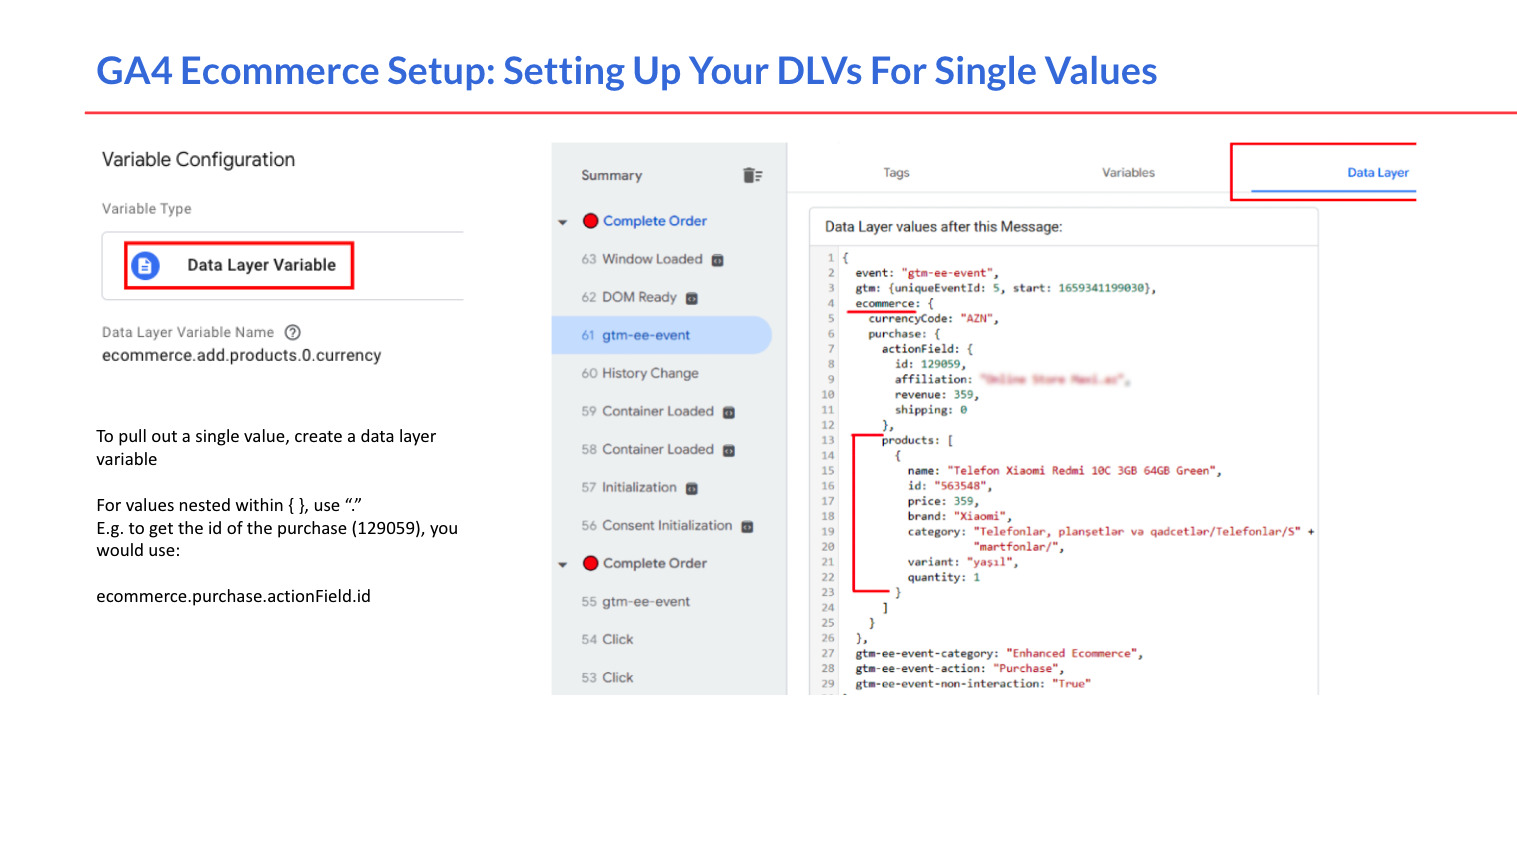
Extracting Values from Arrays in the Data Layer
Some ecommerce parameters, like the items array, contain multiple product objects. To extract specific values from these arrays in GTM, such as the product name, you need to reference the exact index of the item you want.
Using the example data layer above, the products are stored under:
ecommerce.purchase.products
which is an array. To get the name of the first product, create a Data Layer Variable with the path:
ecommerce.purchase.products.0.name
Here, .0. refers to the first item in the array (arrays are zero-indexed). If you want to extract data from the second product, you would use .1. and so on.
Pushing Array Values In Correct Form

When working with data layer values that are arrays—such as the items parameter in ecommerce events—you cannot simply extract individual properties like you do with single strings or numbers. Instead, you need to push the entire array of product objects to GA4 in the correct format.
In the previous example, extracting a single value like a product name (ecommerce.purchase.products.0.name) works well because it’s a string nested inside an array. However, for the items parameter, which expects an array of objects each containing multiple product details (item_id, item_name, price, quantity), you need a more advanced setup.
The common approach is to:
1. Create a Data Layer Variable in GTM that points to the array in the data layer, e.g.:
ecommerce.purchase.products
2. Create a Custom JavaScript Variable that processes this array to format it exactly as GA4 requires.
Here is an example of such a custom JavaScript variable:
function() {
var e = {{dlv – purchase – items}}; // This is the Data Layer Variable pointing to the array
var items = [];
for (var i = 0; i < e.length; i++) {
items.push({
‘item_name’: e[i].name,
‘price’: e[i].price,
‘item_id’: e[i].id,
‘quantity’: e[i].quantity
});
}
return items;
}
This script loops through each product object in the array, extracts the necessary fields, and returns a new array formatted specifically for GA4’s items parameter.
Setting Up Your Triggers For Ecommerce

Each ecommerce event you want to track such as view_item, add_to_cart, or purchase requires its own dedicated trigger in Google Tag Manager. These triggers listen for specific events in the data layer and fire the corresponding tags.
Steps to Create a Trigger for Each Ecommerce Event
1. In GTM, go to Triggers and click New.
2. Choose the Custom Event trigger type.
3. For the Event Name, enter the exact event name as it appears in the Preview & Debug mode’s data layer event stream (e.g., view_item, add_to_cart, purchase). This ensures the trigger listens for the correct event.
4. Set the trigger to fire on All Custom Events or apply additional filters if needed.
5. Save the trigger with a descriptive name, such as “Trigger – View Item” or “Trigger – Purchase Event.”
Setting Up Tags for Ecommerce Events in GTM
When configuring your Google Tag Manager tags to send ecommerce events to GA4, it is crucial that the event names and parameter names used in the tag match exactly what is specified in the official GA4 documentation. Any deviation in these names will cause GA4 to ignore the data, resulting in missing or incomplete ecommerce reports.
Key Points to Remember
Event Name: The name you enter in the tag’s event name field must match the GA4 standard event name precisely (e.g., view_item, add_to_cart, purchase).
Parameter Names: The parameters you map in the tag’s event parameters section must follow the exact naming conventions listed in the GA4 developer reference (GA4 ecommerce events). For example:
- Use currency instead of currencyCode
- Use value instead of revenue
- Use transaction_id exactly, not id
- Use items as an array with objects containing item_id and item_name
Why Exact Matching Matters
GA4 relies on these standardized event and parameter names to correctly process and display ecommerce data. Incorrect names mean that although your tags may fire successfully, the data will not be recognized by GA4’s ecommerce reporting system.
Setting Up Ecommerce Tracking For Woo Commerce WordPress
When setting up ecommerce tracking for WooCommerce stores on WordPress, a highly effective way to streamline the process is by using the Google Tag Manager for WordPress (GTM4WP) plugin – https://gtm4wp.com/. This plugin handles approximately 80% of the standard ecommerce tracking requirements out of the box, including pushing essential ecommerce events and data to the data layer in the correct format.
By leveraging GTM4WP, marketers and developers can save significant time on manual setup and reduce errors, allowing you to focus on customizing and optimizing your tracking for your specific business needs.
Installing and Configuring GTM4WP for WooCommerce Tracking
Follow these steps to install and set up the Google Tag Manager for WordPress (GTM4WP) plugin for enhanced ecommerce tracking on your WooCommerce store:
- Install the Plugin
- In your WordPress backend, navigate to Plugins > Add New.
- Search for “Google Tag Manager for WordPress” or GTM4WP.
- Click Install Now and then Activate the plugin.
- Configure WooCommerce Integration
- After activation, go to Google Tag Manager > Integration in the WordPress dashboard menu.
- Select the WooCommerce tab to access ecommerce settings.
- Enable Recommended Settings
Check the following options to ensure comprehensive ecommerce data is pushed to the data layer:- Track Enhanced Ecommerce
- Cart as 1st Checkout Step
- Cart Content in Data Layer
- Customer Data in Data Layer
- Order Data in Data Layer
- Exclude Tax from Revenue
- Exclude Shipping from Revenue

How GTM4WP Populates the Data Layer
Once you enable the WooCommerce integration settings in GTM4WP, the plugin automatically injects code into your site to populate the data layer with essential ecommerce information. This includes data on products viewed, added to cart, customer details, order information, and more.
These data layer pushes follow the structure required for enhanced ecommerce tracking and serve as the foundation for your GTM tags to pick up and send accurate events to GA4.
To give you a clearer idea of what happens behind the scenes, here are example screenshots taken from the official GTM4WP GitHub repository, showing sample data layer snippets generated by the plugin:

By automatically managing these data layer pushes, GTM4WP covers about 80% of the standard ecommerce tracking implementation, reducing manual setup work and potential errors.

Creating a Single Trigger for GTM4WP Ecommerce Events
When using the GTM4WP plugin, you only need one custom trigger in Google Tag Manager to capture all standard ecommerce events pushed by the plugin. This simplifies your tag management while ensuring all relevant events are tracked.
- Steps to Create the Trigger
In Google Tag Manager, go to Triggers and click New. - Choose the Custom Event trigger type.
- For the Event Name, enter the following regex pattern to match multiple ecommerce events:
view_item|view_item_list|select_item|add_to_cart|remove_from_cart|view_cart|begin_checkout|add_payment_info|add_shipping_info|purchase
- Check the box for Use Regex Matching to enable the trigger to fire on any of these event names.
- Set the trigger to fire on All Custom Events.
- Name the trigger clearly, e.g., GTM4WP Ecommerce Events Trigger.
- Save the trigger.

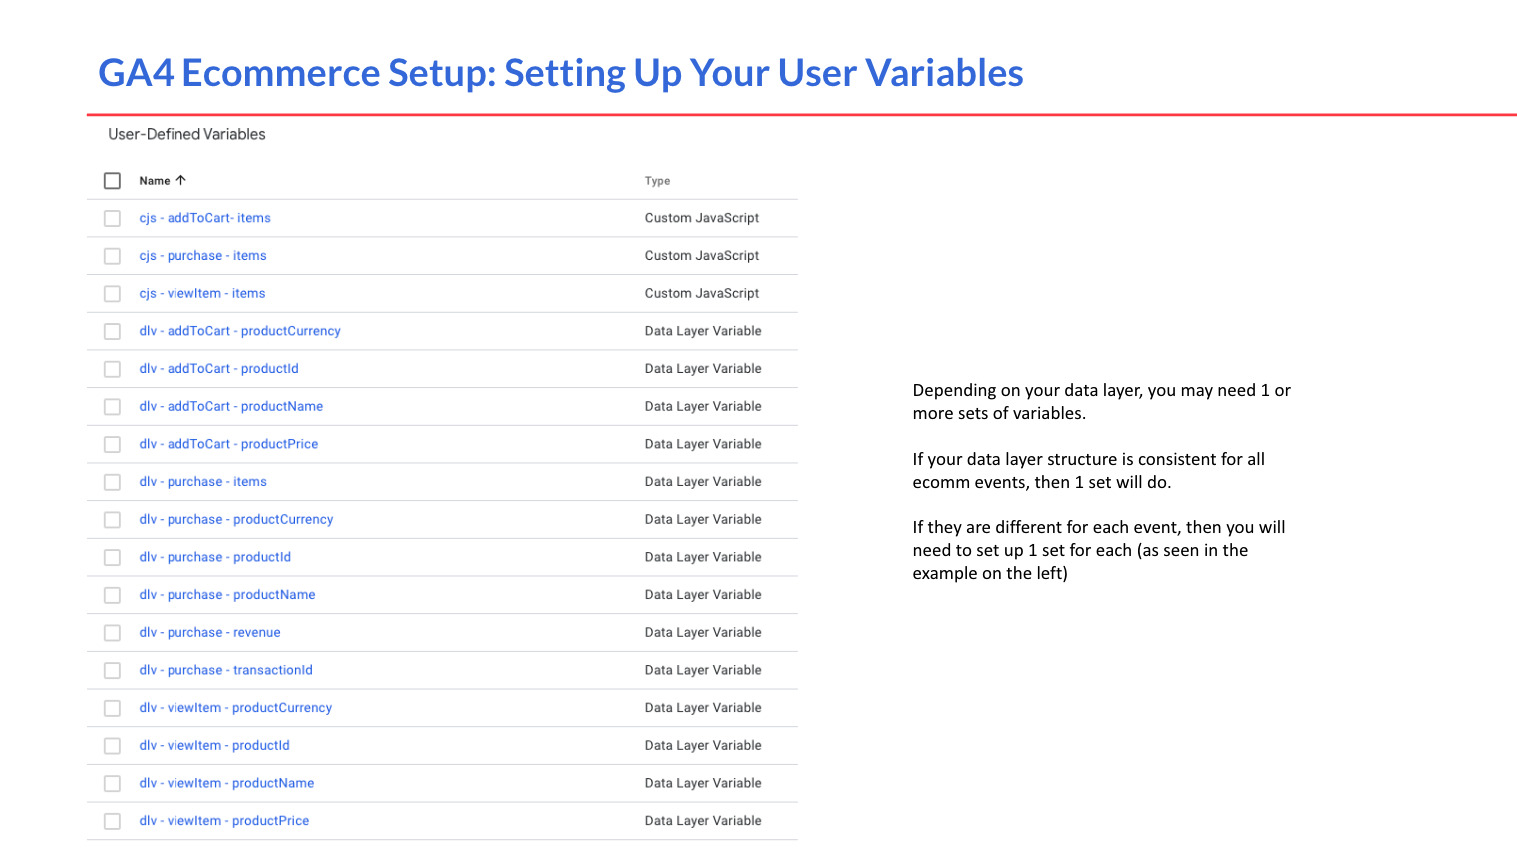
Creating Variables for Mandatory GA4 Ecommerce Parameters
To successfully send ecommerce events to GA4 via GTM, you need to create variables that extract all mandatory parameters from the data layer. These variables will be used in your GA4 event tags to map the correct values.
Based on the GA4 recommended ecommerce events documentation and typical data layer structures (such as those used by GTM4WP), the key mandatory parameters and corresponding variable setups include:

Creating Data Layer Variables in GTM
Go to Variables in GTM and click New.
Select Data Layer Variable as the variable type.
Enter the appropriate Data Layer Variable Name (the full nested path), for example:
- ecommerce.currencyCode
- ecommerce.purchase.actionField.revenue
- ecommerce.purchase.actionField.id
- ecommerce.products (for array, see below)
Name your variables clearly, e.g., DLV – Currency, DLV – Purchase Value, DLV – Transaction ID.
Handling the items Array
Because items is an array of product objects, you should:
Create a Data Layer Variable pointing to the array in the data layer (e.g., ecommerce.products or ecommerce.purchase.products).
Use a Custom JavaScript Variable to format this array into the exact structure GA4 requires (mapping fields like item_id, item_name, price, and quantity).
Refer to the earlier section on Handling Array Values for an example script.
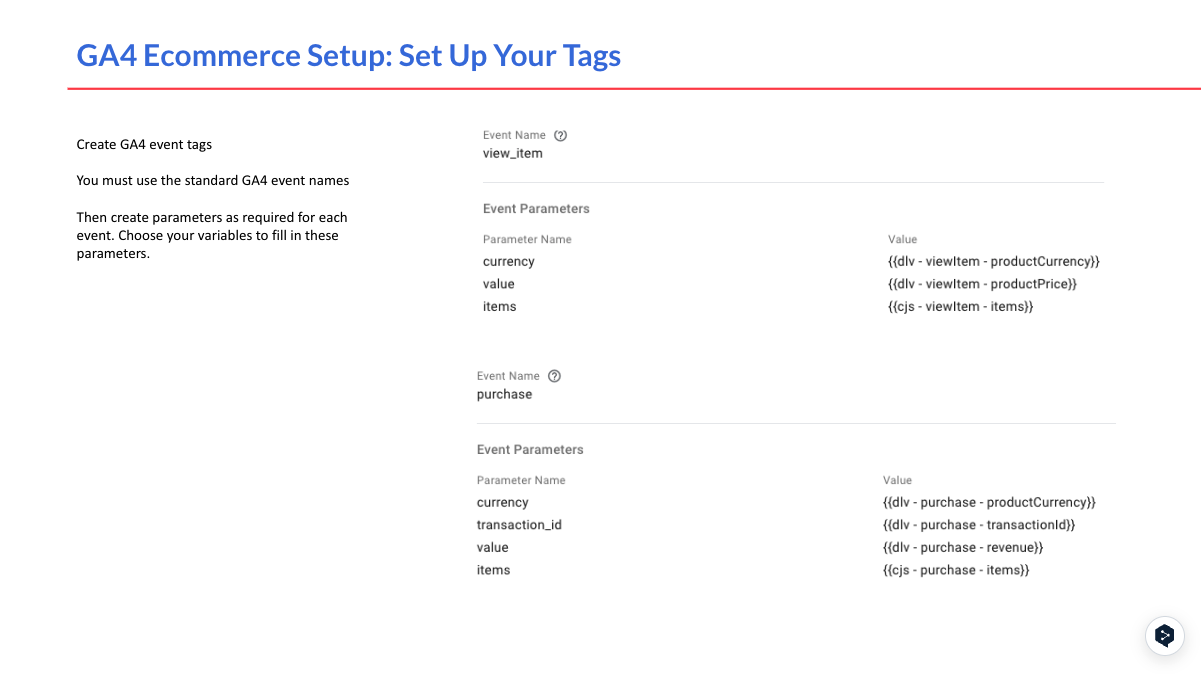
Creating the GA4 Ecommerce Event Tag
Once your variables for all required ecommerce parameters are set up, the final step is to create a GA4 Event Tag in Google Tag Manager that sends the data to your GA4 property.
- Steps to Create the Tag:
In GTM, navigate to Tags and click New. - Select Google Analytics: GA4 Event as the tag type.
- Choose your existing GA4 Configuration Tag or enter your Measurement ID directly.
- In the Event Name field, enter the exact ecommerce event name you want to track (e.g., purchase, add_to_cart, view_item). This must match the GA4 documentation exactly.
- Under Event Parameters, add all the required parameters as key-value pairs, using the variables you created:
-
- currency → {{DLV – Currency}}
- value → {{DLV – Purchase Value}} (or corresponding variable for the event)
- transaction_id → {{DLV – Transaction ID}} (for purchase event)
- items → {{JSV – Formatted Items Array}} (custom JavaScript variable for items)
- Assign the appropriate Trigger (e.g., your custom ecommerce event trigger like purchase trigger or the regex trigger if using GTM4WP).
- Name your tag clearly, for example, GA4 – Ecommerce Purchase Event.
- Save and publish your container after thorough testing.

Use the GTM4WP Prebuilt Google Tag Manager Container
To simplify your ecommerce tracking setup even further, GTM4WP offers an updated Google Tag Manager container that you can import directly into your GTM workspace. This container comes pre-configured with the necessary variables, triggers, and tags for enhanced ecommerce tracking with GA4.
By using this ready-made container available at GTM4WP’s setup guide, you can save time and reduce the complexity of manual configuration — getting your WooCommerce store tracking up and running quickly and accurately.
Google Analytics 4 / GA4 – Enhanced Ecommerce tracking – How to setup?
Conclusion
Setting up ecommerce tracking in Google Analytics 4 (GA4) can vary significantly depending on the content management system (CMS) or website framework you’re using. While this guide outlines the essential steps and best practices, it’s important to recognise that modifications may be required to fit your specific platform or setup.
At First Page Digital, we are a leading digital marketing agency with extensive experience implementing ecommerce tracking across various CMSs and website environments. If you need expert assistance to tailor and optimize your GA4 ecommerce tracking setup, feel free to reach out to our team for professional support.
Additionally, if you are setting up further tracking for GA4 on your website, consider visiting our other tracking guides:
Contact Form 7 Form Submission Tracking
Gravity Form Submission Tracking
WPforms Form Submission Tracking
Forminator Form Submission Tracking