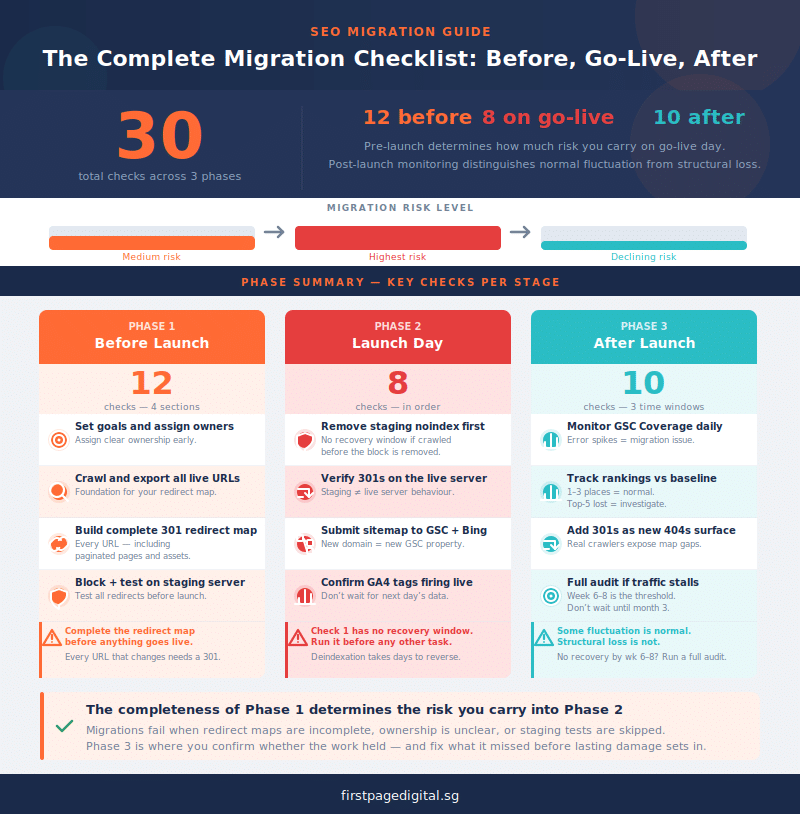
A successful SEO migration requires action at three distinct stages: before the migration, on launch day, and in the weeks that follow. Handled well, a migration protects your existing rankings and can improve them. Handled without a proper SEO plan, it routinely causes traffic losses that take months to recover from, and sometimes never fully do. This guide covers every stage of the process, from pre-migration audit through to post-launch monitoring, so you know exactly what to do for SEO migration regardless of whether you are changing domain, platform, URL structure, or all three.
What Is an SEO Migration?
A website migration is the technical change event: moving to a new domain, switching CMS platforms, restructuring URLs, or redesigning the site. An SEO migration is the parallel preservation process: the systematic work of auditing, mapping, and protecting search engine signals so that the rankings and organic traffic built up over time survive that change intact.
The distinction matters because the two are often treated as the same thing. Development teams manage the technical migration; SEO considerations get folded in as an afterthought, or not at all. An SEO migration is not an optional add-on to the technical work. It is the discipline that determines whether the technical change helps or harms the site’s organic performance. Every URL change, platform switch, and domain move creates an opportunity for search engines to reassign or lose the accumulated authority, backlink equity, and relevance signals those pages have earned. The checklist below exists to prevent that from happening.
At First Page Digital, we manage SEO migrations for businesses across Singapore and the region, from single-domain redesigns to complex multi-market platform transitions. The framework in this guide reflects what we apply in practice.
Types of Website Migration and Their SEO Risk Level
Not all migrations carry the same SEO risk. Before working through the checklist, identify the migration type you are executing. This determines how rigorous your preparation needs to be and which checklist items are most critical for your situation.
| Migration Type | Description | SEO Risk Level |
| HTTPS migration | Moving from HTTP to HTTPS (SSL) | Low: provided redirects are implemented cleanly and no mixed content issues are introduced |
| CMS / platform migration (no URL changes) | Switching CMS (e.g. WordPress to Drupal) while preserving existing URL structure | Low to Medium: risk depends on how accurately metadata, schema, and canonical tags are replicated in the new platform |
| Site redesign (no URL changes) | New design and templates applied to the existing site structure | Low to Medium: risk depends on whether template changes affect title tags, headings, structured data, or page speed |
| URL structure change | Changing the pattern of existing page URLs (e.g. /category/page/ to /page/) | High: every changed URL requires a 301 redirect from old to new; link equity transfer depends on complete, accurate redirect mapping |
| Domain migration | Moving the entire site to a new domain name | High: entire link equity profile must be transferred; Google must be notified; backlink reclamation from referring domains is required |
| Subdomain to subfolder (or reverse) | Moving content between blog.example.com and example.com/blog/ | High: Google treats subdomains and subfolders differently; consolidating authority requires careful redirect handling and may take several months to stabilise |
| Structural / architecture change | Significant reorganisation of site hierarchy and navigation | High: affects internal linking patterns, crawl budget distribution, and category page authority; requires comprehensive mapping and post-migration crawl analysis |
| Hybrid migration | Combination of two or more of the above types | Very High: each additional migration type compounds risk; requires the most rigorous application of the full checklist and extended post-migration monitoring |
Hybrid migrations, such as combining a domain change with a platform switch and a URL restructure, carry compounded risk because each type introduces its own SEO implications simultaneously. The more migration types involved, the more thorough the preparation, verification, and monitoring need to be.
Phase 1: Pre-Migration SEO Checklist
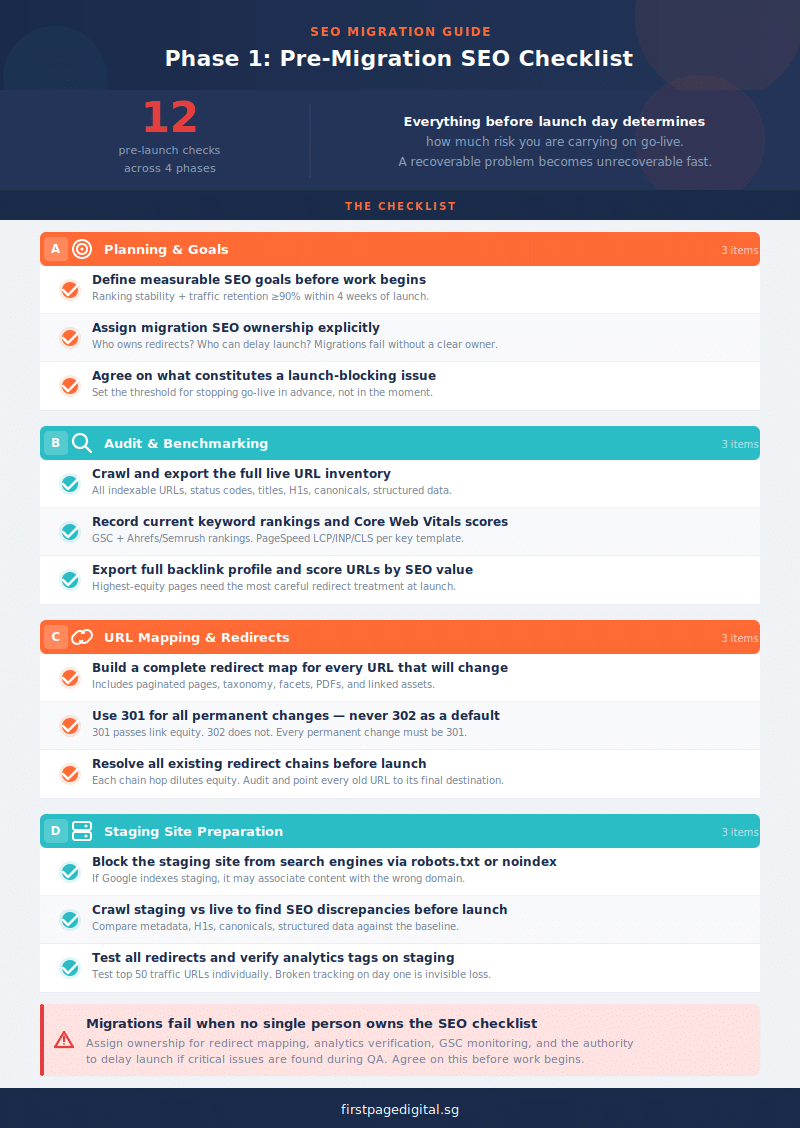
Everything that happens before launch day determines how much risk you are carrying on go-live day. The more thoroughly this phase is completed, the smaller the chance of a recoverable problem becoming an unrecoverable one.
A. Planning and Goals
- Define clear SEO goals for the migration. Establish what success looks like before any work begins: ranking stability for existing top-performing pages, traffic retention above a target threshold (typically 90 per cent within four weeks of launch), improved organic performance on specific target keywords, or faster load times for Core Web Vitals improvement. Goals set here become the benchmarks against which post-migration performance is measured.
- Identify all stakeholders and assign migration SEO responsibilities. Confirm who owns redirect mapping, who verifies analytics tags, who monitors GSC post-launch, and who has authority to delay launch if critical SEO issues are found during QA. Migrations that fail often do so because no single person owned the SEO checklist.
B. Audit and Benchmarking
- Crawl the live site using Screaming Frog, Ahrefs, or Semrush to export a complete URL inventory. This list is the foundation for your redirect map. Export all indexable URLs, status codes, title tags, meta descriptions, H1s, canonical tags, and structured data markup. This snapshot becomes your pre-migration baseline.
- Export keyword rankings for the current site. Use Google Search Console, Ahrefs, or Semrush to record current position data for all tracked keywords. This is the benchmark against which post-migration rankings will be assessed. Without this, it is impossible to distinguish migration-related losses from coincidental fluctuation.
- Record Core Web Vitals scores and page speed baselines. Use PageSpeed Insights and the Core Web Vitals report in GSC to capture current LCP, INP, and CLS scores for key page templates. The migration should improve or maintain these scores. Any degradation post-launch is a regression that needs to be identified and addressed.
- Audit inbound backlinks using Ahrefs or Semrush. Export the full backlink profile, noting the highest-value referring domains and the specific URLs they link to. For domain migrations, this list drives the outreach plan for updating referring domains to the new URL. For URL structure changes, it identifies which pages carry the most link equity and therefore require the most careful redirect treatment.
- Identify top-performing pages by organic traffic and backlink equity. Use Google Analytics and your backlink export to score URLs by SEO value. Pages that drive the most organic traffic and carry the most referring domains require priority treatment in redirect mapping. A broken redirect on these pages costs significantly more than a broken redirect on a low-traffic page.
C. URL Mapping and Redirects
- Build a complete redirect map from every old URL to its new destination. Every URL in the site inventory that will change needs a corresponding entry in the redirect map. This includes paginated pages, taxonomy listings, filter and facet URLs, and any non-HTML assets (images, PDFs, downloadable files) that receive direct traffic or are linked from high-authority external pages.
- Use 301 redirects for all permanent URL changes and 302 redirects only for temporary relocations. A 301 passes accumulated link equity to the new URL; a 302 does not. Every changed URL on a permanent migration should use 301. Do not use 302 as a default. It will not consolidate the authority of the old URL into the new one.
- Map retired or deleted pages to the most relevant remaining page using 410 or 301. Pages that have no equivalent on the new site should return a 410 status code (content permanently gone) or redirect to the closest relevant live page. Do not redirect all retired pages to the homepage. This creates what Google calls a “soft 404” and provides no SEO benefit.
- Check redirect chains in the existing site and resolve them before launch. If old redirects from previous site changes are already in place, importing them into the new redirect map can create chains (A redirects to B, B redirects to C). Each hop in a chain dilutes link equity transfer. Audit for chains and resolve each to point directly to the final destination URL.
D. Staging Site Preparation
- Set up a staging site that replicates the new site completely. The staging environment is where all testing and QA occurs before anything goes live. It must be an accurate replica of the new site, including content, templates, metadata, and any CMS or platform configurations.
- Block the staging site from search engines using robots.txt disallow or noindex. This is a critical step. If Google crawls and indexes the staging site before launch, it will find a duplicate of the new site at a different URL and may begin associating content with the staging domain rather than the live one. Verify this block is in place before any staging work begins, and verify it is removed from the live site before launch day.
- Crawl the staging site against the live site to identify SEO discrepancies. Use Screaming Frog or a similar tool to crawl the staging site and compare its metadata, H1s, canonical tags, and structured data against the live site baseline export. Any discrepancies (missing title tags, incorrect canonicals, stripped structured data) must be resolved before launch. Our technical SEO team runs this comparison as a standard pre-launch step on every migration we manage.
- Test all redirect rules in the staging environment. Implement the redirect map on the staging server and verify that every old URL in the inventory resolves correctly to its new destination, with the correct status code, no redirect chains, and no redirect loops. Test the top 50 highest-traffic URLs individually. Do not rely on a random sample for high-value pages.
- Verify analytics and conversion tracking tags on the staging site. Confirm that Google Analytics 4, Google Tag Manager, and any conversion tracking pixels are correctly implemented across all page templates on the staging site. Migration frequently strips or breaks tracking tags when CMS templates are rebuilt. Discovering this after launch, rather than before, makes post-migration performance invisible.
Phase 2: Launch Day SEO Checklist
Complete this checklist in order on launch day. Do not proceed to post-migration monitoring until all items have been verified. Launch day is the highest-risk moment of any migration. A single unchecked item can cause immediate and severe ranking consequences that are entirely avoidable.
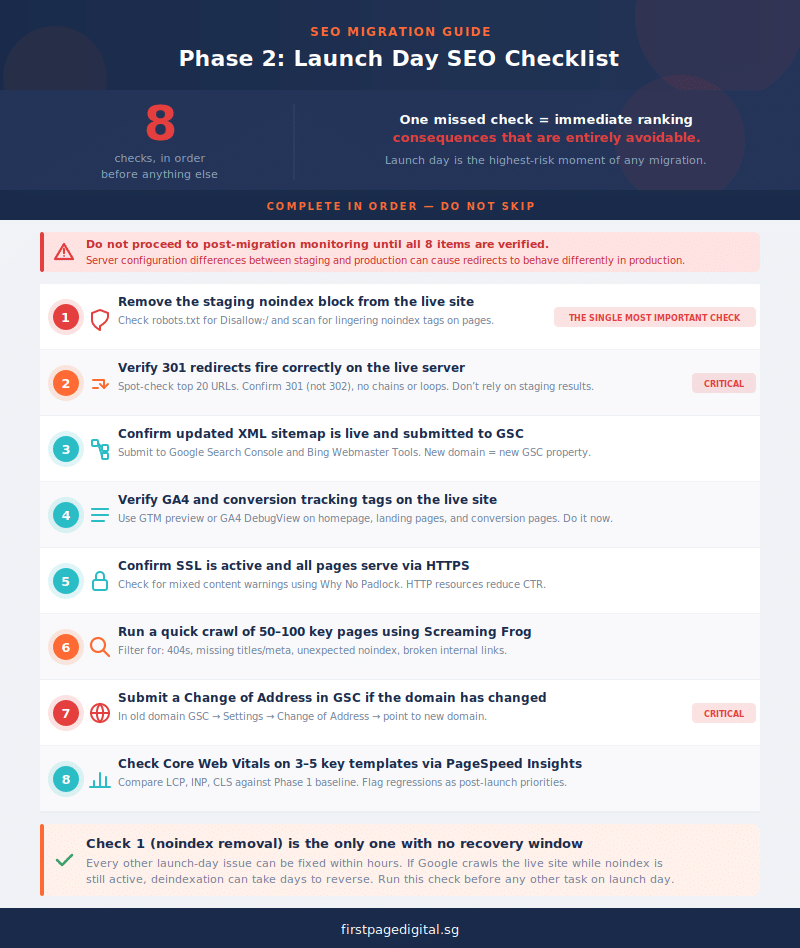
- Confirm the staging noindex block has been removed from the live site before any other task. Navigate to the live site’s robots.txt file and verify it does not contain a Disallow: / rule. Also check that no individual pages have been left with a noindex meta tag from the staging configuration. This is the single most important launch-day check.
- Verify 301 redirects are firing correctly on the live server. Spot-check the top 20 highest-traffic URLs from the old site by entering them in a browser and confirming they redirect cleanly to the correct new destination. Use a tool like Redirect Path (browser extension) to verify the status code is 301 rather than 302, and confirm there are no redirect chains or loops. Do not rely solely on the staging test. Server configuration differences between staging and production sometimes cause redirects to behave differently in production.
- Confirm the updated XML sitemap is live and submit it to Google Search Console. Verify the sitemap reflects the new URL structure and contains only the intended indexable pages. In GSC, navigate to Sitemaps and submit the new sitemap URL. If the domain has changed, submit the sitemap in the new domain’s GSC property. Also submit the sitemap to Bing Webmaster Tools.
- Verify Google Analytics and conversion tracking tags are firing on the live site. Use Google Tag Manager’s preview mode or the GA4 DebugView to confirm tags are firing correctly on the live site homepage, key landing pages, and conversion pages (checkout confirmation, lead form thank-you, contact submission). Do this immediately after launch. Do not wait until the next day’s traffic data confirms whether tracking is working.
- Confirm the SSL certificate is active and all pages are serving via HTTPS with no mixed content warnings. Check the browser padlock on the homepage and several internal pages. Use a tool like Why No Padlock to scan for mixed content (HTTP resources loaded on an HTTPS page), which can trigger browser security warnings that reduce user trust and CTR.
- Run a quick crawl of 50 to 100 key pages using Screaming Frog. Filter results for: pages returning 404 errors, pages missing title tags or meta descriptions, pages returning unexpected noindex directives, and any broken internal links on high-traffic templates. Resolve any critical issues immediately rather than logging them for later.
- If the domain has changed, set up a Google Search Console property for the new domain and submit a Change of Address request. In the old domain’s GSC property, navigate to Settings and submit a Change of Address notification pointing to the new domain. This signals to Google that the site has moved permanently and accelerates the consolidation of authority to the new domain.
- Check Core Web Vitals scores on three to five key page templates using PageSpeed Insights. Compare against the pre-migration baseline recorded in Phase 1. Any significant regression in LCP, INP, or CLS should be flagged immediately as a post-launch priority, even if it is not immediately addressable on launch day itself.
Phase 3: Post-Migration Monitoring Checklist
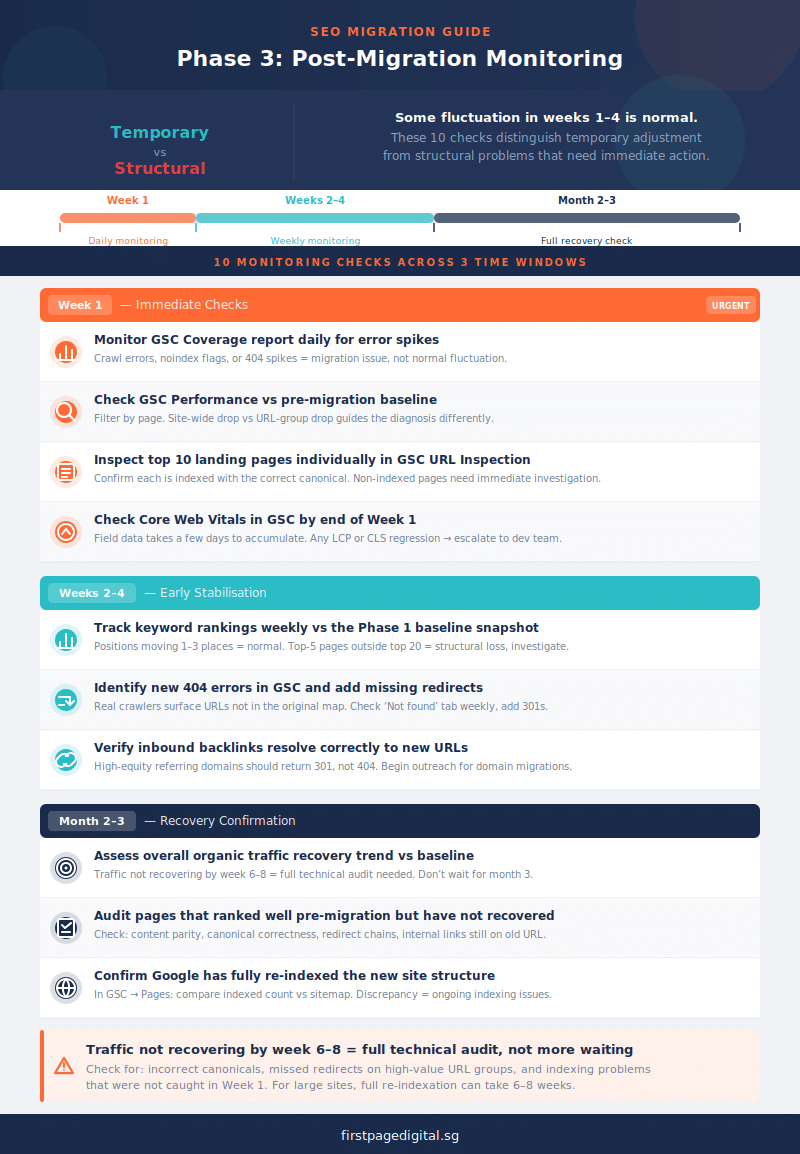
Some ranking fluctuation in the first two to four weeks after migration is normal. Google is recrawling and re-evaluating the site, and positions may shift before they stabilise. The goal of this phase is to distinguish temporary adjustment from structural SEO problems that require immediate attention, and to catch any issues that were missed in Phases 1 and 2 before they cause lasting damage.
Week 1: Immediate Checks
- Monitor the GSC Coverage report daily. Look for unexpected increases in crawl errors, pages flagged as noindex, or 404 errors. Any sharp spike in errors in the first week is a signal that something in the migration did not execute as planned and needs immediate investigation.
- Check the GSC Performance report against your pre-migration baseline. A significant drop in clicks or impressions vs the pre-migration period warrants investigation. Filter by page to identify whether the drop is site-wide or concentrated on specific URL groups. This distinction guides the diagnosis.
- Verify key landing pages are being indexed using the GSC URL Inspection tool. Enter your ten highest-traffic landing pages individually and confirm they are indexed and being crawled with the correct canonical. Pages that are not indexed within the first week may have an indexing issue (noindex tag, canonical pointing elsewhere, or crawl access problem) that needs to be resolved before rankings can recover.
- Monitor Core Web Vitals in GSC for any degradation vs pre-migration scores. The Core Web Vitals report takes a few days to accumulate field data after launch. Check it by the end of Week 1 and compare against your baseline. Any regression in LCP or CLS on key page templates should be escalated to the development team.
Weeks 2 to 4: Early Stabilisation
- Track keyword rankings weekly against the pre-migration baseline export. Use Ahrefs, Semrush, or GSC to compare current positions against the ranking snapshot taken in Phase 1. Distinguish between normal short-term fluctuation (positions moving by one to three places) and structural losses (pages that were in the top 5 now outside the top 20 or not ranked). Structural losses on high-value pages require investigation.
- Identify 404 errors accumulating in GSC and add missing redirects. The initial redirect map will not cover every URL. As real users and crawlers request old URLs in the weeks after launch, new 404 errors will surface. Check the GSC Coverage report’s “Not found” tab weekly and add 301 redirects for any URLs generating meaningful traffic or coming from high-authority external links.
- Verify inbound backlinks are resolving correctly to the new URLs. Use Ahrefs or Semrush to check that high-value referring domains are now pointing to the correct new URLs and receiving 301 responses rather than 404s. For domain migrations, begin outreach to the most important referring domains (those sending the highest link equity) to update their links directly to the new domain. Direct links pass more equity than redirected ones.
Month 2 to 3: Recovery Confirmation
- Assess overall organic traffic recovery trend against the pre-migration baseline. By month two, traffic should be tracking back toward or above pre-migration levels for a well-executed migration. If traffic has not begun recovering by week six to eight, conduct a full technical audit to identify systemic issues: incorrect canonicals, missed redirects on high-value page groups, or indexing problems that were not caught in Week 1 monitoring.
- Identify pages that have not recovered rankings and audit them individually. For pages that ranked well before the migration but have not recovered their positions by month two, audit for: content integrity (is the content on the new URL equivalent to or better than the old URL?), canonical correctness, redirect chain issues (is the old URL going through a chain rather than a direct 301?), and internal linking (are other pages still linking to the old URL instead of the new one?).
- Confirm Google has fully re-indexed the new site structure. In GSC, check the indexed page count under Pages. Compare this against the expected count based on your sitemap submission. Significant discrepancies between submitted and indexed pages indicate ongoing indexing issues that require investigation. For large sites, full re-indexation after a migration can take six to eight weeks.
What Happens When You Skip SEO During a Migration?
Migration without an SEO plan is one of the most reliable ways to destroy years of accumulated search visibility in a matter of days. These are not edge cases. They are the predictable outcomes of the most common omissions.
Traffic loss. Sites that migrate without a redirect strategy effectively tell search engines that every changed URL is a brand-new page with no history and no authority. Organic traffic losses of 30 to 60 per cent in the weeks following an unplanned migration are common, and the lost traffic does not automatically return when you realise the problem. In competitive markets, the rankings those pages held may have already been claimed by competitors who kept their positions stable.
Ranking drops. Search engines assign authority and relevance signals to specific URLs over time. When a URL changes without a 301 redirect, all the accumulated signals (the backlinks, the crawl history, the engagement data) are reset to zero for the new URL. Google does not automatically connect the new URL to the old one’s history. Every URL that changes without a clean redirect is, from Google’s perspective, a new page competing from scratch.
Indexing failures. One of the most damaging and most avoidable migration errors is leaving a staging environment’s noindex directive active on the live site after launch. Search engines respect this instruction immediately and begin deindexing the site within days of discovering it. A site that was fully indexed in the morning can be effectively invisible to Google by the end of the week. This mistake is entirely preventable, and it appears in the launch-day checklist below for exactly that reason.
Recovery timelines. Recovering from a poorly executed migration typically takes three to six months of active remediation. In some cases, pages that held top positions before the migration never fully regain them. The authority and trust signals that Google accumulated for those URLs over years cannot be instantly recreated. The checklist below covers every stage of the migration process to prevent each of these outcomes. For a deeper treatment of how to protect rankings specifically, working through every stage of the checklist below is the best starting point.
Common SEO Migration Mistakes to Avoid
These are the errors that appear most frequently in migration audits, and that cause the most avoidable traffic loss. Each one is preventable with the checklist above.
Redirect chains instead of direct 301s
A redirect chain occurs when URL A redirects to URL B, which redirects to URL C, rather than going directly from A to C. Each additional hop dilutes the link equity being passed and slows Googlebot’s ability to follow and index the final destination. Chains most commonly build up when new redirects are added without auditing the existing redirect configuration. Audit all redirect logic before launch and resolve every chain to point directly to the final destination URL.
Forgetting non-HTML assets
Images, PDFs, downloadable resources, and media files that appear in image search results or are directly linked from external pages are frequently omitted from redirect mapping because the migration team focuses on page URLs. A product PDF that has backlinks from industry publications, or an infographic that ranks in image search, represents real SEO value that disappears if the file URL changes without a redirect. Include all non-HTML assets in the pre-migration URL inventory.
Leaving the staging noindex on the live site
This is the single most damaging and most preventable migration mistake. A staging site must be blocked from search engines during development, but that block must be explicitly removed before or immediately at launch. When the staging noindex directive is accidentally carried forward to the live site, Google begins deindexing the site within days of encountering it. Entire sites have gone from fully indexed to effectively invisible within a week because of this single omission. It is item one on the launch-day checklist for this reason.
Missing analytics and conversion tracking tags
CMS migrations and template rebuilds frequently break tracking tag implementation across page templates. If analytics tags are not firing correctly on the live site from day one, post-migration performance becomes invisible. You cannot measure whether rankings recovered, which pages are driving conversions, or whether traffic is trending toward the baseline. Verifying analytics on the staging site before launch (Phase 1) and on the live site on launch day (Phase 2) closes this gap. Discovering the problem two weeks after launch means two weeks of performance data is lost entirely.
Not benchmarking before the migration
Without pre-migration keyword rankings, traffic baselines, and Core Web Vitals scores, it is impossible to determine whether post-migration changes are migration-related or coincidental. A traffic drop that begins two weeks after launch could be caused by the migration, by a Google algorithm update, or by seasonal factors. You cannot tell which without a baseline to compare against. The benchmark export in Phase 1 is not optional; it is the measurement reference for everything that follows.
Launching on a Friday
This is a practical risk that is often overlooked. Technical teams are typically at reduced capacity or unavailable over the weekend, and a full business day can pass before migration problems are identified and acted on. A redirect configuration error discovered on a Friday evening may not be fixed until Monday, by which time Googlebot has crawled the site multiple times and begun to record the incorrect state. Schedule migrations for Tuesday, Wednesday, or Thursday so that the full team is available for the first 24 to 48 hours of post-launch monitoring.
Frequently Asked Questions
What is an SEO migration checklist?
An SEO migration checklist is a structured set of tasks covering the three phases of a website migration: before launch (audit, URL mapping, redirect preparation, staging verification), on launch day (noindex removal, redirect verification, sitemap submission, analytics confirmation), and after launch (GSC monitoring, ranking tracking, 404 resolution, backlink verification). It exists because website migrations carry an inherent risk of organic traffic and ranking loss. The checklist is the operational framework for preventing that loss.
How do I migrate a website without losing SEO?
Start by benchmarking. Export current keyword rankings, traffic baselines, and Core Web Vitals scores before any changes are made. Map every URL that will change to a direct 301 redirect pointing to its new equivalent. Test all redirects on a blocked staging site before launch. On go-live day, immediately remove any staging noindex directives, verify redirects are firing correctly in production, submit the updated sitemap to Google Search Console, and confirm analytics tags are working. In the weeks following launch, monitor GSC daily for indexing errors, track rankings against the pre-migration baseline, and add any missing redirects as 404 errors surface.
How long does an SEO migration take?
Planning and execution for a mid-sized site (500 to 5,000 URLs) typically requires four to twelve weeks from initial audit to launch day. Larger sites with complex URL structures, multiple languages, or a domain change require more time for redirect mapping and stakeholder coordination. Post-migration monitoring should continue for at least two to three months after launch. Rankings often take six to eight weeks to fully stabilise following a major migration, and some pages may require individual attention if they do not recover within that window.
What should I do after a website migration for SEO?
In the first week: monitor the GSC Coverage report daily for unexpected 404s and noindex errors, check the Performance report against your pre-migration baseline, and verify key landing pages are indexed via the URL Inspection tool. In weeks two to four: track keyword rankings weekly, identify and fix any 404 errors accumulating from missed redirects, and verify that backlinks from high-value referring domains are resolving correctly to the new URLs. In months two to three: assess whether overall organic traffic has recovered toward the pre-migration baseline, audit any individual pages that have not regained their rankings, and confirm the full site has been re-indexed by checking page counts in GSC against your sitemap.
Get Expert Help With Your SEO Migration
A well-executed migration protects your existing rankings and can strengthen them. A poorly executed one can undo years of accumulated organic authority in a matter of days, and the recovery is slow and uncertain. The three-phase checklist above covers every stage of the process, but the execution is only as reliable as the team carrying it out.
First Page Digital’s technical SEO team has managed website migrations for businesses across Singapore and the APAC region, from single-domain redesigns to complex multi-market platform transitions. We handle the audit, redirect mapping, staging QA, launch-day verification, and post-migration monitoring that determines whether a migration preserves or loses rankings. For ongoing SEO services after the migration, our campaigns build on the organic equity preserved through the migration rather than rebuilding from a setback. If you want to know more about protecting specific ranking signals through a move, our guide on how to avoid losing rankings during migration covers the most common failure points in detail.